Posted by Alessandra on Wednesday Sep 22, 2010
Filed under :Brazilian Recipes, Desserts
I always enjoyed it when my mom made this dessert. As a kid I loved the different colors and shapes that you can create with this recipe. I hope you enjoy it as well.
Pick 3 or 4 flavors of Jell-o (you can make any colorful flavors you like. The more colorful, the cooler it will be)
1 can sweetened condensed milk
1 can table cream (creme de leite-you can find this in the International isle)
1 pkg of unflavored gelatin
Water

Prepare each jell-o according to package directions. Usually you use 1 cup of hot water, dissolve the jell-o then add 1 cup of cold water. Pour the liquid into a dish. I used a 9×13 pan. Refrigerate until it hardens.
Cut the jell-0 into squares. You can be creative here and cut them into different shapes if you like.

Put all the cut jell-o together into a serving dish and set aside. Once again any shape. I make one in a 9×13 pan and a small one in a cup.

Prepare the white Jell-o:
Take 1/2 cup of hot water and dissolve the unflavored gelatin.
Add the sweetened condensed milk and table cream.

Mix well. Pour this mixture on top of the prepared dish of cut jell-o.


Refrigerate until it hardens.


This is how it looks when it is cut! Fun huh?

Enjoy!
Posted by Alessandra on Tuesday Sep 7, 2010
Filed under :Appetizers, Desserts

A couple weeks ago, a friend and I got together to bottle some peaches. We also made peach honey and we loved it. I had a variety of plums at my house and we just weren’t eating them. So, I figure I would try to make some plum honey and see if it worked out. I really enjoyed the taste and texture. It is a very good spread for breads. Also, if you thin it out, it makes a great glaze for cakes and such.
First you will need a bunch of the fruit; in this case plum. Wash and cut them. Boil with a little bit of water and about 1/2 cup sugar.

Let is boil until most of the fruit turns into a mush. Then strain it to obtain the juice.

Make sure to scrape the bottom of your strainer.

Measure the amount of juice you have and pour it into a sauce pan. Bring it to boil on medium heat and add 1/2 of the amount of juices of sugar (ex if you had 2 cups of juice, add 1 cup of sugar). Cook until it starts to thicken. Mix constantly.

Keep mixing often until it gets very thick.

You can now pour into jars and process the jars, or just keep jars in the fridge.
YUM!
Posted by Alessandra on Monday Aug 23, 2010
Filed under :Desserts

I have been talking about rainbows with my son, telling him stories, etc. I thought it would be fun to make a rainbow cake with him. He is always cooking with me in the kitchen. This was a fun, messy project. Just as any project with a 2 year old would be. I saw this idea online in many other blogs and decided to try it.
Rainbow Cake:
For the cake: (you may use a box of yellow or white cake mix)
6 eggs
2 1/2 c sugar
3 c flour
1 T baking powder
1 1/4 c milk or water
1 t vanilla
8 T butter (melted)
Mix the milk (or water) with the butter and vanilla. Set aside. Using an eletric mixer, beat the egg whites until soft peaks. Add the yolks, one at a time. Mix in the sugar until fluffy. Add 1 cup of flour and 1/2 of the liquid mixture. Keep doing this until all the flour is used. Stir in the baking powder.
For the Colors:
I used gel colors from Wilton. They give a nice vibrant color. You may also use liquid if you want.
You will need the colors of the raibowl: red, orange, yellow, green, blue, indigo and violet (I used the same for the last 2 colors)
Divide the cake batter until 7 containers and color each one with its color.

Spray a cake pan with oil and dust it with flour. Then add the colors one by one on top of each other.

Bake for about 35- 40 minutes or until cake is done.
You may decorate as much as you want. I decided to leave my without a frosting. I used a little bit of orange juice and sugar to make a syrup and drizzled that on top of the cake.
My son had a lot of fun making this with me. He is still asking for the rainbow cake every day!!!

Posted by Alessandra on Monday Aug 9, 2010
Filed under :Desserts
I will always remember my first bite of cheesecake. I was having a difficult day and my American Mom/friend (what a wonderful woman) told me that it was time she introduced me to cheesecake. I translated the word in my head, cheese= queijo, cake= bolo, “bolo de queijo”. Huh?!? No thanks! But she insisted and I tried it. Yes it was a love at first bite! So good…
Cheesecake is also a lot of fun to make. It can be a little tricky to keep the top from cracking, but even if the top cracks it is still cheesecake and it is still delicious! I will also share some tricks about keeping your top nice and smooth at the end of this post!

Bunches of Chocolate Cheesecake:
Preheat oven to 350 degrees F if using a silver spring form pan, or 325 degrees F if using a dark nonstick spring form pan.
For the crust:
1 cup crushed oreo cookies
1/2 c crushed grahm crackers
1 T sugar
2 T melted butter
Lightly grease the bottom and sides of a spring form pan (9 inch). Mix the oreos, graham crackers and sugar together. Add butter and mix with your fingers. Press into the bottom of the pan and set it aside. You could use any type of crackers to make this crust. I like using oreos and graham crackers together. It feels like the graham crackers make the crust a little lighter then just using oreos alone.

For the Chocolate Cheesecake:
16 ounces of cream cheese (softened at room temperature)
1 cup sugar
1 teaspoon vanilla extract
1 teaspoon chocolate essence (extract)
2 tablespoons flour
1 tablespoon cocoa
3 eggs
1 1/2 cup sour cream
8 ounces melted dove dark chocolate, cooled slightly
Using an electric mixer, combine cream cheese, sugar, vanilla and chocolate extracts and beat until creamy. Add the flour, cocoa and mix until smooth.

Add the melted chocolate and sour cream, mix well.

Then add the eggs, 1 at a time, mixing on low speed after each addition until just blended. Pour the batter into prepared pan and bake for about 1 hour. Or until the center is almost set. It will be a little wobbly when you touch.
Cool the cake on a wire rack. Top it with Chocolate Ganache:
4 ounces of melted chocolate (dove dark chocolate)
1/2 cup of heavy cream
Mix it well and spread it over the cheesecake.

Refrigerate. Top with chocolate shavings and fresh raspberry. Enjoy!

To prevent crack tops:
The top of the cheesecake can crack because of the temperature is too hot. You could cook your cheesecake in a water bath and bring it to cool very slowly to prevent the top to crack. Also running a knife around the rim of the pan when the cake is cooked and cooling will allow cake to pull it from the sides and prevents cracking. You could also use a thermometer and make sure your cheesecake does not go over 150 degrees F.
Posted by Alessandra on Friday Jul 30, 2010
Filed under :Desserts
Yes that is right, besides Nutella Day and Ice Cream Day, Cheesecake Day is one of my favorites!!!

If you are lucky to have a Cheesecake Factory close by, today is the day to go visit it. They are offering 1/2 of on any slice of cheesecake! Which is an amazing deal!

Now if you are not brave to go to the cheesecake factory today, don’t you worry I am going to share with you my favorite No-Bake Cheesecake recipe. This is delicious and impressive for a No-Bake recipe. If you want to make the “real” thing, just stay tuned. I will be making a chocolate cheesecake for this Sunday’s dinner and will post the steps and recipe next week.
Here is the amazing No-Bake Cheesecake
1 (9 inch) Graham Cracker Crust
1 (8-oz) pkg. Cream Cheese, softened
1 (14-oz) can Sweetened Condensed Milk
1/3 cup Lemon Juice
1 tsp. Vanilla
1 (21-oz) can Cherry Pie Filling
Beat cream cheese until fluffy. Gradually beat in the sweetened condensed milk until nice and smooth. Stir in lemon juice and vanilla. Pour into prepared crust. Chill 3 hours, or until set up. Top with pie filling before serving!
YUM
Posted by Alessandra on Tuesday Jul 27, 2010
Filed under :Desserts, The Dairing Kitchen

The July 2010 Daring Bakers’ challenge was hosted by Sunita of Sunita’s world – life and food. Sunita challenged everyone to make an ice-cream filled Swiss roll that’s then used to make a bombe with hot fudge. Her recipe is based on an ice cream cake recipe from Taste of Home.
This was a fun challenge. It was perfect for the hot summer we are having! I thought it was light and easy to use your creativity. You could make a white cake, chocolate cake. You can choose so many different ice cream flavors and the fudge just brings it all together. I decided to make my bombe with a chocolate cake, filled with a Peach whipped cream. Inside the bombe I choose to have vanilla ice cream, chocolate fudge and peaches.
First you will need to make The cake:
6 medium sized eggs
1 C sugar + extra for rolling
6 tblsp flour + 5 tblsp unsweetened cocoa powder, sifted together
2 boiling water
a little oil for brushing the pans
Pre heat the oven at 400 F . Brush the baking pans ( 11 inches by 9 inches ) with a little oil and line with parchment paper.
In a large mixing bowl, add the eggs and sugar and beat till very thick; when the beaters are lifted, it should leave a trail on the surface for at least 10 seconds.

Add the flour mixture, in three batches and fold in gently with a spatula. Fold in the water.

Divide the mixture among the two baking pans and spread it out evenly, into the corners of the pans.

Place a pan in the center of the pre-heated oven and bake for about 10-12 minutes or till the center is springy to the touch
Spread a kitchen towel on the counter and sprinkle a little sugar over it.
Turn the cake on to the towel and peel away the baking paper. Trim any crisp edges.
Starting from one of the shorter sides, start to make a roll with the towel going inside. Cool the wrapped roll on a rack, seam side down.
Repeat the same for the next cake.
The cake filling–
2 C whipping cream
1 vanilla pod, cut into small pieces of about ½ cm (or 1 tsp vanilla extract)
5 tblsp caster sugar
1/2 c of peaches (I took the skin out and diced them into small pieces)
Grind together the vanilla pieces and sugar in a food processor till nicely mixed together. If you are using vanilla extract, just grind the sugar on its own and then add the sugar and extract to the cream. Beat cream and vanilla sugar until very thick. Fold in cut peaches.

Open the cake rolls and spread the cream mixture, making sure it does not go right to the edges (a border of ½ an inch should be fine). Roll the cakes up again, this time without the towel. Wrap in plastic wrap and chill in the fridge till needed, seam side down.
The vanilla ice cream-
2 and ½ C whipping cream
1 vanilla bean, minced or 1 tsp vanilla extract
½ C of granulated sugar
Grind together the sugar and vanilla in a food processor. In a mixing bowl, add the cream and vanilla –sugar mixture and whisk lightly till everything is mixed together. If you are using the vanilla extract, grind the sugar on its own and then and the sugar along with the vanilla extract to the cream.
Pour into a freezer friendly container and freeze till firm around the edges. Remove from the freezer, beat till smooth and return to the freezer. Do this 3-4 times and then set completely.
The Hot fudge sauce-
1 C sugar
3 tblsp cocoa powder
2 tblsp cornstarch
1 and ½ C water
1 tblsp butter
1 tsp vanilla extract
In a small saucepan, whisk together the sugar, cocoa powder, cornflour and water.
Place the pan over heat, and stir constantly, till it begins to thicken and is smooth (for about 2 minutes).
Remove from heat and mix in the butter and vanilla. Keep aside to cool .
How to put it all together:
Slice your cakes into about 1 inch slices. Line a bowl with plastic wrap and arrange two slices at the bottom of the bowl, with their seam sides facing each other. Arrange the Swiss roll slices up the bowl, with the seam sides facing away from the bottom, to cover the sides of the bowl. Cover the bowl with plastic wrap and freeze till the slices are firm (at least 30 minutes).

Soften the vanilla ice cream. Take the bowl out of the freezer, remove the cling film cover and add the ice cream on top of the cake slices. Spread it out to cover the bottom and sides of the bowl. Cover the bowl with plastic wrap and freeze till firm ( at least 1 hour)
Add the fudge sauce over the vanilla ice cream. Fill it with peach slices and cover with the rest of cake. Freeze till firm ( at least an hour)

Place the serving plate on top of the bowl. Turn it upside down and remove the bowl and the plastic lining. If the bowl does not come away easily, wipe the outsides of the bowl with a kitchen towel dampened with hot water. The bowl will come away easily.

Slice and serve! YUM

Posted by Alessandra on Sunday Jul 4, 2010
Filed under :Desserts
There are so many amazing ideas out there for a 4th of July treat. I decided to make one of the most cleaver cake ideas I have seen. It came from the blog 17 and baking. Elissa is inspiring! I hope you enjoy this idea as much as I did.
As for the recipe I decided to try the recipe featured on the blog Delectable deliciousness. The cake was fabolous, lemony, moinst and very good. The frosting, was heavenly! I thought it complemented the cake beautifully!
Happy 4th of July to everyone!

I forgot to bring my camera to the BBQ party we went, so my dear husband took the picture for me, but if you notice, the blue part of flag is on the wrong side! oops!!!
Perfect Party Cake
from Dorie Greenspan’s “Baking: From My Home to Yours”
2 1/4 cup cake flour
1 tablespoon baking powder
1/2 teaspoon salt
1 1/4 cups whole milk or buttermilk (I used buttermilk)
4 large egg whites
1 1/2 cups sugar
2 teaspoons grated lemon zest
1 stick (8 tablespoons) unsalted butter, room temperature
1/2 teaspoon pure lemon extract
1. Preheat oven to 350°F. Spray two 9-inch round cake pans with non stick spray. Optional – line the bottoms with a round of parchment. If using, also spray the parchment with non stick spray.
2. Sift together flour, baking powder and salt. Set aside.
3. Whisk together the milk and egg whites in a medium bowl. Set aside.
4. In the bowl of your electric mixer, combine the sugar and lemon zest and rub the lemon zest into the sugar with your fingers until well incorporated. The mixture will become moist and very fragrant.
5. Add the butter to the sugar/zest mixture and, using the paddle attachment, beat on medium speed for a full 3 minutes. Add the lemon extract and 1/3 of the flour mixture; add 1/2 of the milk/egg white mixture and continue to beat at medium speed, then add half of the remaining flour mixture, then the rest of the milk/eggs and finish with the remaining flour. Once all ingredients are combined, beat the batter for a good 2 minutes to ensure it is thoroughly mixed and well areated.
6. Pour into prepared pans and bake for approximately 30 minutes, or until a toothpick inserted into the center comes out clean.
Make 1 and 1/2 recipes for the red, white and blue cake. I used about 1 t of gel food coloring to color red and blue.
White Chocolate Frosting
adapted from foodnetwork
5 ounces good quality white chocolate, chopped fine
2 sticks (1 cup) unsalted butter, room temperature
3 cups powdered sugar, sifted
pinch salt
1/2 teaspoon vanilla extract
1/4 cup sour cream
1. Melt white chocolate over a double boiler or in microwave. Set aside to cool.
2. In the bowl of an electric mixer fitted with the paddle attachment, beat the butter until light a fluffly. Slowly add the powdered sugar until well combined.
3. Add the salt, vanilla extract and sour cream and beat until very smooth.
4. Add the melted white chocolate and beat just until combined.
Posted by Alessandra on Sunday Jun 27, 2010
Filed under :Desserts, The Dairing Kitchen
The June 2010 Daring Bakers’ challenge was hosted by Dawn of Doable and Delicious. Dawn challenged the Daring Bakers’ to make Chocolate Pavlovas and Chocolate Mascarpone Mousse. The challenge recipe is based on a recipe from the book Chocolate Epiphany by Francois Payard

Pavlova is meringue based dessert usually filled with cream and fresh fruits. It is very light and delicious. The challenge this month had us make a chocolate version filled with chocolate mousse and drizzled with a Mascarpone Cream that use Crème Anglaise as a base. It was very good. I decided to make mini pavlovas. I also had a bit of chocolate mousse and mascarpone cream left which turned into an amazing cake! Will post pictures! I hope you try this recipe. It was way worth it. There will be 4 recipes here. The first will be the meringue for the pavlova shell. Second will be the chocolate mouse. Third and Fourth will go together. You need to make Third (Crème Anglaise) so you can make recipe four which is the Mascarpone Cream
Recipes are adapted from the Daring Kitchen Arquives
Recipe 1: Chocolate Meringue (for the chocolate Pavlova):
3 egg whites
½ cup plus 1 tbsp granulated sugar
¼ cup powder sugar
1/3 cup cocoa powder
Line two baking sheets with silpat or parchment and set aside. Preheat the oven to 200º F.
In the mixer, whip the egg whites until soft peaks form. Increase speed to high and gradually add granulated sugar about 1 tbsp at a time until stiff peaks form. (The whites should be firm but moist.)
Sift the powder sugar and cocoa powder over the egg whites and fold the dry ingredients into the white.

Fill a pastry bag with the meringue. Pipe the meringue into whatever shapes you desire. Alternatively, you could just free form your shapes and level them a bit with the back of a spoon. (Class made rounds, hearts, diamonds and an attempt at a clover was made!) As you can see I made little cups. I used the star tip and just piped the bottom as a circle, then piped one more time around creating the edge.

Bake for 2-3 hours until the meringues become dry and crisp. Cool and store in an airtight container for up to 3 days.
Recipe 2: Chocolate Mascarpone Mousse:
1 ½ cups heavy cream
grated zest of 1 average sized lemon
9 ounces 72% chocolate, chopped
1 2/3 cups mascarpone
pinch of nutmeg
2 tbsp orange juice
Put ½ cup of the heavy cream and the lemon zest in a saucepan over medium high heat. Once warm, add the chocolate and whisk until melted and smooth. Transfer the mixture to a bowl and let sit at room temperature until cool.
Place the mascarpone, the remaining cup of cream and nutmeg in a bowl. Whip on low for a minute until the mascarpone is loose. Add the orange juice and whip on medium speed until it holds soft peaks. (DO NOT OVERBEAT AS THE MASCARPONE WILL BREAK.)
Mix about ¼ of the mascarpone mixture into the chocolate to lighten. Fold in the remaining mascarpone until well incorporated. Fill a pastry bag with the mousse. Pipe or fill your meringue shells.
Recipe 3: Crème Anglaise (a component of the Mascarpone Cream below): (I made half of this recipe)
1 cup whole milk
1 cup heavy cream
1 vanilla bean, split or 1 tsp pure vanilla extract
6 large egg yolks
6 tbsp sugar
In a bowl, whisk together the egg yolks and sugar until the mixture turns pale yellow.
Combine the milk, cream and vanilla in a saucepan over medium high heat, bringing the mixture to a boil. Take off the heat.
Pour about ½ cup of the hot liquid into the yolk mixture, whisking constantly to keep from making scrambled eggs. Pour the yolk mixture into the pan with the remaining cream mixture and put the heat back on medium. Stir constantly with a wooden spoon until the mixture thickens enough to lightly coat the back of a wooden spoon. DO NOT OVERCOOK.

Remove the mixture from the heat and strain it through a fine mesh sieve into a bowl. Cover and refrigerate until the mixture is thoroughly chilled, about 2 hours or overnight.
Recipe 4: Mascarpone Cream (for drizzling): (also made half of this recipe)
1 recipe crème anglaise
½ cup (120 mls) mascarpone
2 tbsp orange juice
½ cup (120 mls) heavy cream
Prepare the crème anglaise. Slowly whisk in the mascarpone and the orange juice and let the mixture cool.
Put the cream in a bowl and beat with electric mixer until very soft peaks are formed.
Fold the cream into the mascarpone mixture.

Assembly:
Pipe the mousse onto the pavlovas and drizzle with the mascarpone cream over the top. Dust with confectioner’s sugar and fresh fruit if desired.

Here is the cake idea I made with the leftovers.

It is a chocolate cake filled with chocolate mouse and mascarpone cream. Covered with Chocolate mouse. Topped with bitters sweet chocolate mouse, chocolate mouse, raspberries. Sides are crushed pavlovas and drizzled with mascarpone cream.

Posted by Alessandra on Thursday May 27, 2010
Filed under :Desserts, The Dairing Kitchen
The May 2010 Daring Bakers’ challenge was hosted by Cat of Little Miss Cupcake. Cat challenged everyone to make a Piece Montée, or croquembouche, based on recipes from Peter Kump’s Baking School in Manhattan and Nick Malgieri.

I joined the Daring Kitchen last month and have been anxiously waiting to hear what the challenge of April would be. I was so excited to see that a Piece Montée would be my first Daring Kitchen challenge. I have always wanted to make one of these.
A Piece Montée, also called Croquembouche is a French dessert. It is basically a montage of those delicious cream puffs. The cream puffs are made with Pate a Choux. (If you have never tried making Pate a Choux, try it. It is easy and delicious. You can make puffs, eclairs and let your imagination run with it.) Then you have the filling, usually a pastry cream. Then you have the glaze, usually sugar or chocolate.
I decided to fill my puffs with whipped cream and Dulce di Leche. Then I couldn’t decide on the glaze so I thought it would be fun to do both chocolate and spun sugar.
Pate a Choux (recipe from The Daring Kitchen Archives)
¾ cup water
6 Tbsp. unsalted butter
¼ Tsp. salt
1 Tbsp. sugar
1 cup all-purpose flour
4 large eggs
For Egg Wash: 1 egg and pinch of salt
Pre-heat oven to 425◦F degrees. Line two baking sheets with parchment paper.
Combine water, butter, salt and sugar in a saucepan over medium heat. Bring to a boil and stir occasionally. At boil, remove from heat and sift in the flour, stirring to combine completely.
Return to heat and cook, stirring constantly until the batter dries slightly and begins to pull away from the sides of the pan.
Transfer to a bowl and stir with a wooden spoon 1 minute to cool slightly.
Add 1 egg. The batter will appear loose and shiny. As you stir, the batter will become dry-looking like lightly buttered mashed potatoes.
It is at this point that you will add in the next egg. Repeat until you have incorporated all the eggs.

Transfer batter to a pastry bag fitted with a large open tip (I piped directly from the bag opening without a tip). Pipe choux about 1 inch-part in the baking sheets. Choux should be about 1 inch high about 1 inch wide. Using a clean finger dipped in hot water, gently press down on any tips that have formed on the top of choux when piping. You want them to retain their ball shape, but be smoothly curved on top. Brush tops with egg wash (1 egg lightly beaten with pinch of salt).

Bake the choux at 425◦F degrees until well-puffed and turning lightly golden in color, about 10 minutes.
Lower the temperature to 350F degrees and continue baking until well-colored and dry, about 20 minutes more. Remove to a rack and cool.
Can be stored in a airtight box overnight.

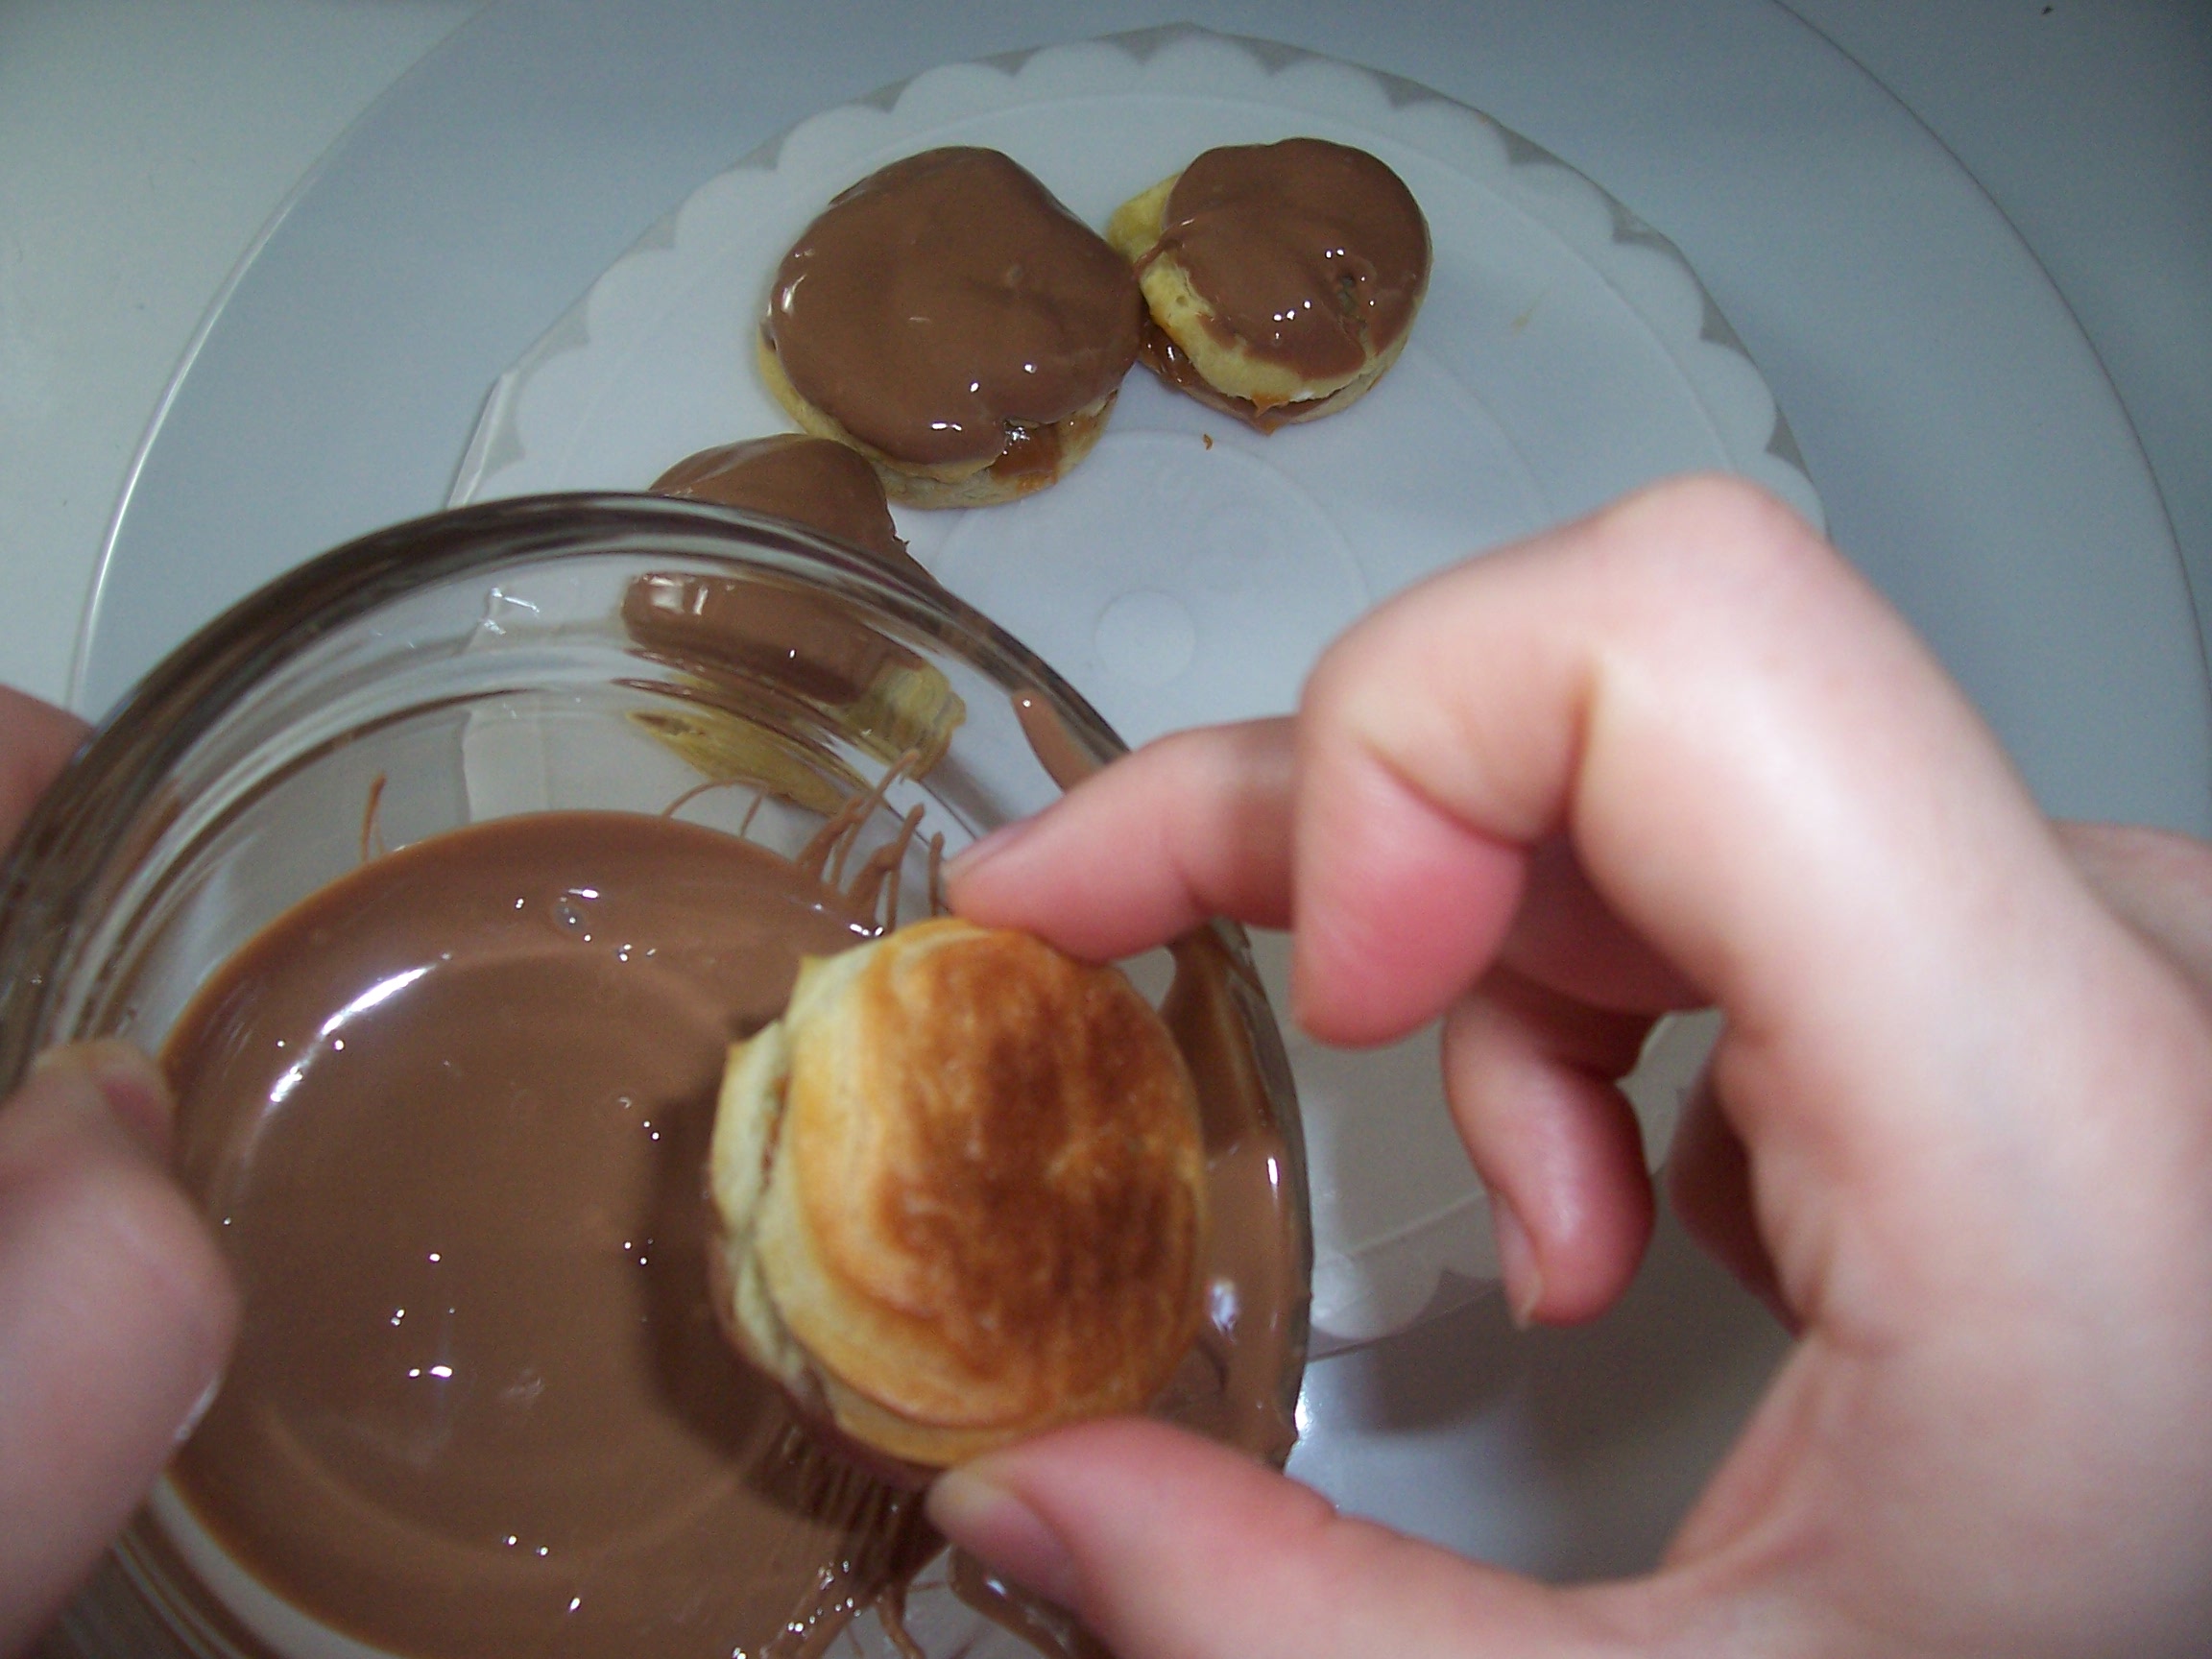
I used a pastry bag with a star tip and filled some of them with Dulce di Leche

some with whipped cream

Then I dipped them in chocolate (milk and white) and here is a picture of the tower 😀

I had never done spun sugar before and it was an interesting project. Fun though… I decided to decorate my piece with sugar art and some spun sugar.


Posted by Alessandra on Tuesday May 18, 2010
Filed under :Brazilian Recipes, Desserts
I have never tasted anything like this treat here in the US. It is like a cookie crust filled with this delicious coconut candy. It is very easy to make. You can make it using the small size muffin tins for finger food size or the big size for a full dessert size. Here is how:
For the dough/ cookie:
2 cups Flour
7 T. Butter (soften)
1 Egg
2 T. Sugar
Mix it all together, until it forms a smooth ball. Cover and set aside.

For the filling:
3 C. Shredded Sweetened Coconut
2 Egg Yolks
1 can Sweetened Condensed Milk
1 T. Sugar
1 T. Butter
In a big sauce pan, mix the coconut, yolks, sweetened condensed milk and sugar. In medium heat mix it until it all comes together and starts to separate from the sides and bottom of the pan. Take it off heat and mix in the butter.

Now, use the dough to cover the muffin tins. Make sure you spread it bottom and sides very well.

Fill each of them with the coconut mixture.

Bake it at 350 until golden brown. About 30 minutes.

YUM…Like I said it is not as creamy as a normal coconut pie, it is more of a candy like texture, but it is very good! Hope you like it 😀


