Posted by Alessandra on Sunday Aug 14, 2011
Filed under :Desserts, The Dairing Kitchen
Jana of Cherry Tea Cakes was our July Daring Bakers’ host and she challenges us to make Fresh Frasiers inspired by recipes written by Elisabeth M. Prueitt and Chad Robertson in the beautiful cookbook Tartine.

Basic Chiffon Cake:
1 cup + 2 tablespoons all-purpose flour
1 teaspoon baking powder
3/4 cups sugar
1/2 teaspoon salt
1/4 cup vegetable oil
3 large egg yolks
⅓ cup + 1 tablespoon water
1 teaspoon pure vanilla extract
3/4 teaspoon lemon zest, grated
5 large egg whites
¼ teaspoon cream of tartar
1.Preheat the oven to moderate 325°F.
2.Line the bottom of an 8-inch spring form pan with parchment paper. Do not grease the sides of the pan.
3.In a large mixing bowl, stir together the flour and baking powder. Add in all but 3 tablespoons of sugar, and all of the salt. Stir to combine.
4.In a small bowl combine the oil, egg yolks, water, vanilla and lemon zest. Whisk thoroughly.
5.Combine with the dry ingredients and mix thoroughly for about one minute, or until very smooth.
6.Put the egg whites into a stand mixer, and beat on medium speed using a whisk attachment on a medium speed, until frothy. Add cream of tartar and beat on a medium speed until the whites hold soft peaks. Slowly add the remaining sugar and beat on a medium-high speed until the whites hold firm and form shiny peaks.
7.Using a grease free rubber spatula, scoop about ⅓ of the whites into the yolk mixture and fold in gently. Gently fold in the remaining whites just until combined.
8.Pour the batter into the prepared pan. Bake for 45 to 55 minutes or until toothpick inserted into the center comes out clean.
9.Removed the cake from the oven and allow to cool in the pan on a wire rack.
10.To unmold, run a knife around the sides to loosen the cake from the pan and remove the spring form sides. Invert the cake and peel off the parchment paper. Refrigerate for up to four days.
Pastry Cream Filling:
1 cup whole milk
1/2 teaspoon pure vanilla extract
1/8 teaspoon salt
2 tablespoons cornstarch
1/4 cup sugar
1 large egg
2 tablespoons unsalted butter
3/4 teaspoon gelatin
1/2 tablespoon water
1 cup heavy cream
1.Pour the milk, vanilla, and salt into a heavy sauce pan. Place over medium-high heat and scald, bringing it to a near boiling point. Stir occasionally.
2.Meanwhile, in a stand mixer add the cornstarch and sugar. Whisk to combine
3.Add the eggs to the sugar and cornstarch and whisk until smooth.
4.When the milk is ready, gently and slowly while the stand mixer is whisking, pour the heated milk down the side of the bowl into the egg mixture.
5.Pour the mixture back into the warm pot and continue to cook over a medium heat until the custard is thick, just about to boil and coats the back of a spoon.
6.Remove from heat and pass through a fine mesh sieve into a large mixing bowl. Allow to cool for ten minutes stirring occasionally.
7.Cut the butter into four pieces and whisk into the pastry cream a piece at a time until smooth.
8.Cover the cream with plastic wrap, pressing the plastic wrap onto the top of the cream to prevent a skin from forming. Chill in the refrigerator for up to five days.
9.In a small dish, sprinkle the gelatin over the water and let stand for a few minutes to soften.
10.Put two inches of water into a small sauce pan and bring to a simmer over a medium heat.
11.Measure 1/4 cup of the chilled pastry cream into a small stainless steel bowl that will sit across the sauce pan with the simmering water, without touching the water.
12.Heat the cream until it is 120 F . Add the gelatin and whisk until smooth. Remove from the water bath, and whisk the remaining cold pastry cream in to incorporate in two batches.
13.In a stand mixer, fitted with the whisk attachment, whip the cream until it holds medium-stiff peaks. Immediately fold the whipped cream into the pastry cream with a rubber spatula.
Simple Syrup:
1/3 cup of sugar
1/3 cup of water
Directions:
1.Combine the water and sugar in a medium saucepan.
2.Bring the mixture to a boil and let the sugar dissolve. Stirring is not necessary, but will not harm the syrup.
3.Remove the syrup from the heat and cool slightly.
4.Transfer syrup to a lidded container or jar that can be stored in the refrigerator. Simple syrup can be stored for up to one month.
Fraisier Assembly:
1 baked chiffon cake
1 recipe pastry cream filling
⅓ cup simple syrup or flavored syrup
2 lbs (900 g) strawberries
Directions:
1.Cut cake into 3 layers
2. Use one of the layers and moisten it evenly with the simple syrup.
3.Hull and slice in half enough strawberries to arrange around the sides. Place them on the side of the cake to form a ring.

4. Spread or pipe cream in the middle.
5. Repeate process until all the layers are used.

6. Spread or pipe the remaining pastry cream on the top of the cake. Refigerate.

Posted by Alessandra on Sunday Mar 27, 2011
Filed under :Desserts, The Dairing Kitchen
The March 2011 Daring Baker’s Challenge was hosted by Ria of Ria’s Collection and Jamie of Life’s a Feast. Ria and Jamie challenged The Daring Bakers to bake a yeasted Meringue Coffee Cake.

This was a delicious, amazing coffee cake recipe. This recipe will make 2 cakes. I made one with dark dove chocolate and one with mixed berries. The dough is fabulous.
FILLED MERINGUE COFFEE CAKE (From the Daring Kitchen Archives)
Makes 2 round coffee cakes, each approximately 10 inches in diameter
The recipe can easily be halved to make one round coffee cake.
Ingredients:
4 cups flour
¼ cup sugar
¾ teaspoon salt
1 package active dried yeast
¾ cup whole milk
¼ cup water)
½ cup unsalted butter at room temperature
2 large eggs at room temperature
For the meringue:
3 large egg whites at room temperature
¼ teaspoon salt
½ teaspoon vanilla
½ cup sugar
For the Chocolate filling:
1 cup chopped pecans or walnuts
2 Tablespoons granulated sugar
¼ teaspoon ground cinnamon
1 cup semisweet chocolate chips or coarsely chopped chocolate
For the Mixed Berry filling:
1 1/2 cups mixed berries
2 Tablespoons granulated sugar
¼ teaspoon ground cinnamon
Egg wash: 1 beaten egg
Cocoa powder (optional) and confectioner’s sugar (powdered/icing sugar) for dusting cakes
Directions:
Prepare the dough:
In a large mixing bowl, combine 1 ½ cups of the flour, the sugar, salt and yeast.
In a saucepan, combine the milk, water and butter and heat over medium heat until warm and the butter is just melted.
With an electric mixer on low speed, gradually add the warm liquid to the flour/yeast mixture, beating until well blended. Increase mixer speed to medium and beat 2 minutes. Add the eggs and 1 cup (150 g) flour and beat for 2 more minutes.
Using a wooden spoon, stir in enough of the remaining flour to make a dough that holds together. Turn out onto a floured surface (use any of the 1 ½ cups of flour remaining) and knead the dough for 8 to 10 minutes until the dough is soft, smooth and elastic, keeping the work surface floured and adding extra flour as needed.
Place the dough in a lightly greased (I use vegetable oil) bowl, turning to coat all sides. Cover the bowl with plastic wrap and a kitchen towel and let rise until double in bulk, 45 – 60 minutes. The rising time will depend on the type of yeast you use.

Prepare your filling:In a small bowl, combine the cinnamon and sugar for the filling if using. You can add the chopped nuts to this if you like, but I find it easier to sprinkle on both the nuts and the chocolate separately.
Once the dough has doubled, make the meringue:
In a clean mixing bowl – ideally a plastic or metal bowl so the egg whites adhere to the side (they slip on glass) and you don’t end up with liquid remaining in the bottom – beat the egg whites with the salt, first on low speed for 30 seconds, then increase to high and continue beating until foamy and opaque. Add the vanilla then start adding the ½ cup sugar, a tablespoon at a time as you beat, until very stiff, glossy peaks form.
Assemble the Coffee Cakes:
Line 2 baking/cookie sheets with parchment paper.
Punch down the dough and divide in half. On a lightly floured surface, working one piece of the dough at a time (keep the other half of the dough wrapped in plastic), roll out the dough into a 20 x 10-inch rectangle. Spread half of the meringue evenly over the rectangle up to about 1/2-inch from the edges. Sprinkle filling of choice evenly over the meringue

Now, roll up the dough jellyroll style, from the long side. Pinch the seam closed to seal. Very carefully transfer the filled log to one of the lined cookie sheets, seam side down. Bring the ends of the log around and seal the ends together, forming a ring, tucking one end into the other and pinching to seal.
Using kitchen scissors or a sharp knife (although scissors are easier), make cuts along the outside edge at 1-inch intervals. Make them as shallow or as deep as desired but don’t be afraid to cut deep into the ring.
Repeat with the remaining dough, meringue and fillings.
Cover the 2 coffee cakes with plastic wrap and allow them to rise again for 45 to 60 minutes.

Preheat the oven to 350°F (180°C).
Brush the tops of the coffee cakes with the egg wash. Bake in the preheated oven for 25 to 30 minutes until risen and golden brown. The dough should sound hollow when tapped.
Remove from the oven and slide the parchment paper off the cookie sheets onto the table. Very gently loosen the coffee cakes from the paper with a large spatula and carefully slide the cakes off onto cooling racks. Allow to cool.
Here is the chocolate one:

Here is the berry one:

Just before serving, dust the tops of the coffee cakes with confectioner’s sugar as well as cocoa powder if using chocolate in the filling. These are best eaten fresh, the same day or the next day.
Posted by Alessandra on Sunday Feb 27, 2011
Filed under :The Dairing Kitchen
The February 2011 Daring Bakers’ challenge was hosted by Mallory from A Sofa in the Kitchen. She chose to challenge everyone to make Panna Cotta from a Giada De Laurentiis recipe and Nestle Florentine Cookies.
I decided to make the chocolate Panna Cotta. My husband loves Dove dark chocolate and I always try to incorporate dove chocolate into my recipes for him!

Chocolate Panna Cotta
Recipe adapted from Bon Appetit
Ingredients:
1 cup whole milk
1 tablespoon unflavored powdered gelatin
2 cups whipping cream
½ cup sugar
¾ cup bittersweet or semisweet chocolate
½ teaspoon vanilla extract
Directions:
Pour milk into a small bowl, sprinkle gelatin over the top, set aside for 2-5 minutes.
Place a medium saucepan over medium heat, stir in cream, sugar and vanilla. Bring to a low boil.
Add chocolate and whisk until melted. Whisk the milk/gelatin mixture into chocolate cream mixture. Whisk until gelatin has dissolved.

Transfer to ramekins, or nice glasses for serving.
Cover and chill at least 8 hours, or overnight.

Nestle Florentine Cookies
Recipe from the cookbook “Nestle Classic Recipes”, and their website.
Ingredients:
2/3 cup unsalted butter
2 cups quick oats
1 cup granulated sugar
2/3 cup plain (all purpose) flour
1/4 cup dark corn syrup
1/4 cup whole milk
1 tsp vanilla extract
pinch of salt
1½ cups dark or milk chocolate
Directions:
Preheat oven to moderately hot 375°F. Prepare your baking sheet with silpat or parchment paper. I used my stoneware from Pampered Chef this way I didn’t need a silpat or parchment paper.
Melt butter in a medium saucepan, then remove from the heat. Add the oats, sugar, flour, corn syrup, milk, vanilla and salt. Mix well.

Drop a tablespoon full onto your prepared baking sheet. Flatten slightly with the back of the spoon.

Bake for 6-8 minutes or until golden brown.

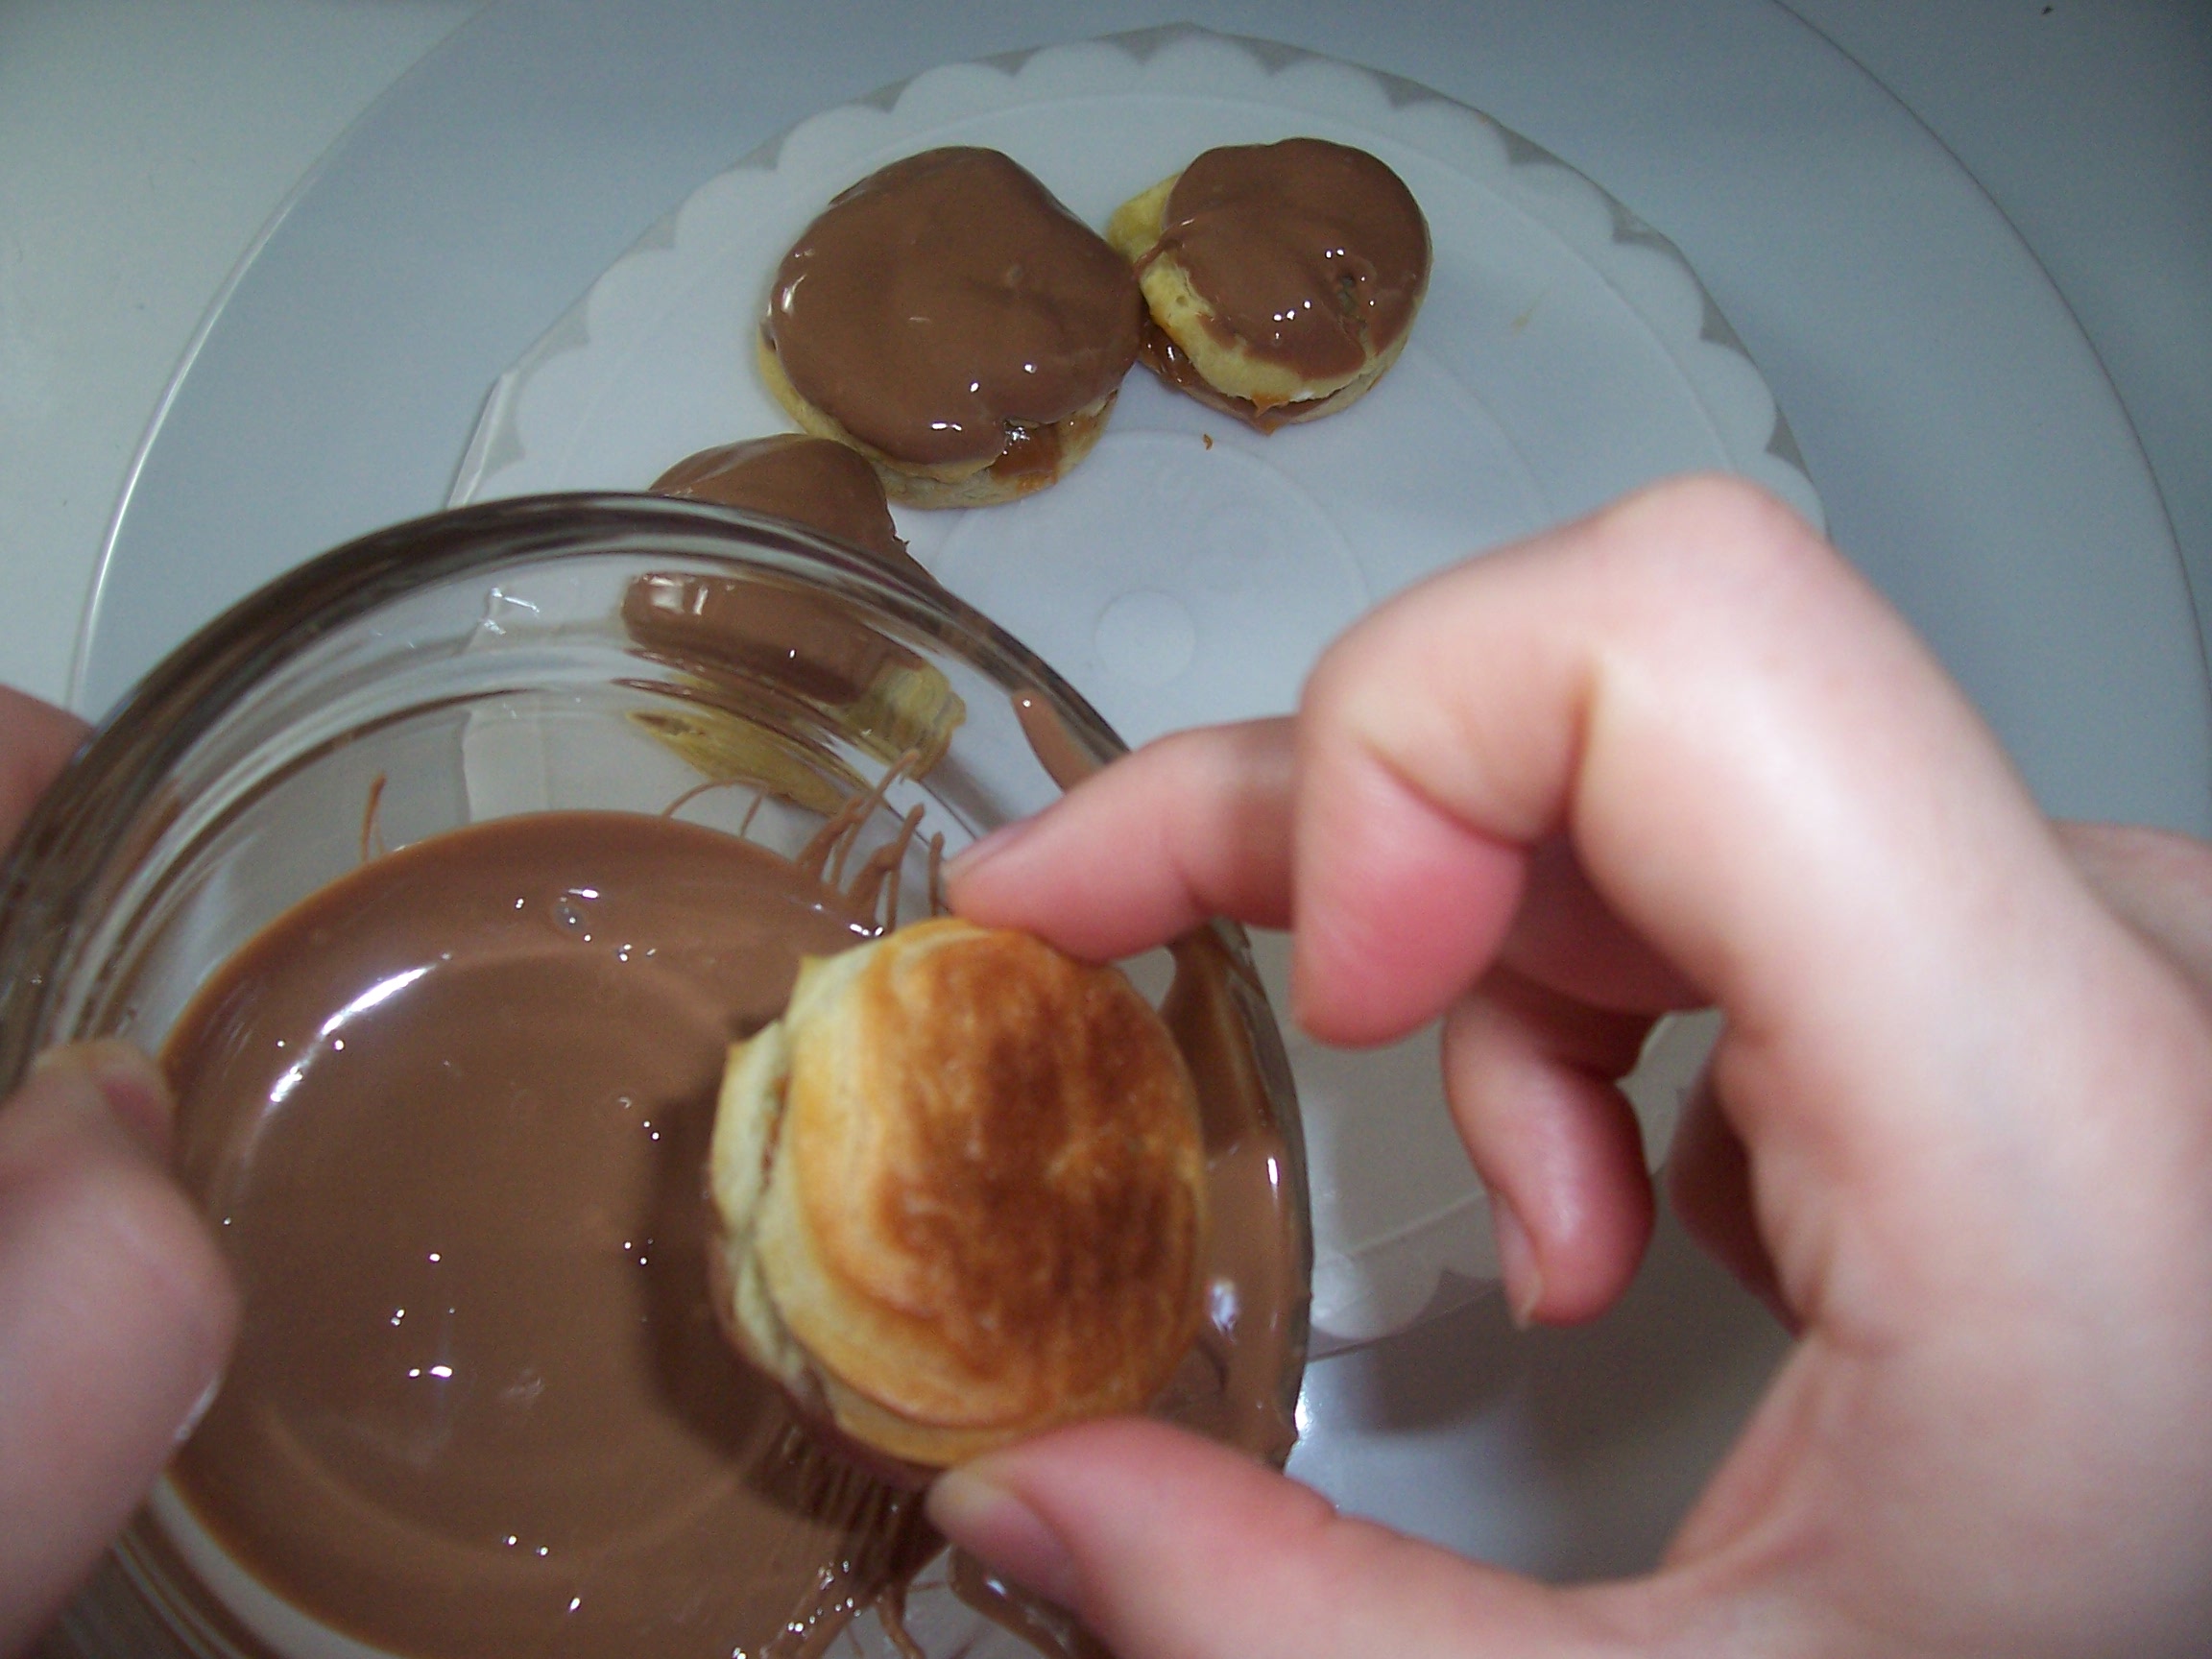
Melt the chocolate, when cookies are cooled transfer them to a wire rack over a sheet of wax/parchment paper. Spread a tablespoon of chocolate on the bottom of the cookie. Sandwiching another cookie on top of the chocolate. Or you can drizzle the melted chocolate on top of the cookie.
Posted by Alessandra on Thursday Jan 27, 2011
Filed under :The Dairing Kitchen
The January 2011 Daring Bakers’ challenge was hosted by Astheroshe of the blog accro. She chose to challenge everyone to make a Biscuit Joconde Imprime to wrap around an Entremets dessert.
Astheroshe explained the fancy words Jaconde Imprime and Entremets as follows:
“A joconde imprime (French Baking term) – a decorative design baked into a light sponge cake providing an elegant finish to desserts/torts/entremets/ formed in ring molds.
Entremets (French baking term) – an ornate dessert with many different layers of cake and pastry creams in a mold, usually served cold. Think Trifle in a mold vs. a glass bowl. “
For the Joconde Sponge
YIELD: Two ½ size sheet pans or a 13” x 18” (33 x 46 cm) jelly roll pan
Ingredients:
¾ cup almond flour/meal
½ cup plus 2 tablespoons confectioners’ (icing) sugar
¼ cup cake flour
3 large eggs
3 large egg whites
2½ teaspoons white granulated sugar or superfine (caster) sugar
2 tablespoons unsalted butter, melted
In a clean mixing bowl whip the egg whites and white granulated sugar to firm, glossy peeks. Reserve in a separate clean bowl to use later.
Sift almond flour, confectioner’s sugar, cake flour. (This can be done into your dirty egg white bowl) On medium speed, add the eggs a little at a time. Mix well after each addition. Mix until smooth and light. (If using a stand mixer use blade attachment. If hand held a whisk attachment is fine, or by hand. ) Fold in one third reserved whipped egg whites to almond mixture to lighten the batter. Fold in remaining whipped egg whites. Do not over mix. Fold in melted butter.Reserve batter to be used later.
For the Patterned Joconde-Décor Paste
YIELD: Two ½ size sheet pans or a 13” x 18” (33 x 46 cm) jelly roll pan
Ingredients
14 tablespoons unsalted butter, softened
1½ cups plus1½ tablespoons Confectioners’ (icing) sugar
7 large egg whites
1¾ cup cake flour
Food coloring gel, paste or liquid
Cream butter and sugar until light and fluffy. Gradually add egg whites. Beat continuously. Fold in sifted flour. Tint batter with coloring to desired color.
Preparing the Joconde- How to make the pattern:
Spread a thin even layer of décor paste approximately 1/4 inch (5 millimeter) thick onto silicone baking mat with a spatula, or flat knife. Place mat on an upside down baking sheet. The upside down sheet makes spreading easier with no lip from the pan.
Pattern the décor paste – Here is where you can be creative. Make horizontal /vertical lines (you can use a knife, spatula, cake/pastry comb). Squiggles with your fingers, zig zags, wood grains. Be creative whatever you have at home to make a design can be used. OR use a piping bag. Pipe letters, or polka dots, or a piped design. If you do not have a piping bag. Fill a ziplock bag and snip off corner for a homemade version of one.
Slide the baking sheet with paste into the freezer. Freeze hard. Approx 15 minutes.
Remove from freezer. Quickly pour the Joconde batter over the design. 
Spread evenly to completely cover the pattern of the Décor paste.

Bake at 475ºF /250ºC until the joconde bounces back when slightly pressed, approx. 15 minutes. You can bake it as is on the upside down pan. Yes, it is a very quick bake, so watch carefully.
Cool. Do not leave too long, or you will have difficulty removing it from mat.
Flip cooled cake on to a powdered sugared parchment paper. Remove silpat. Cake should be right side up, and pattern showing! (The powdered sugar helps the cake from sticking when cutting.)
Preparing the MOLD for entremets:
Start with a large piece of parchment paper laid on a very flat baking sheet. Then a large piece of cling wrap over the parchment paper. Place a spring form pan ring, with the base removed, over the cling wrap and pull the cling wrap tightly up on the outside of the mold. Line the inside of the ring with a curled piece of parchment paper overlapping top edge by ½ inch. CUT the parchment paper to the TOP OF THE MOLD. It will be easier to smooth the top of the cake.
A biscuit cutter/ cookie cutter- using cling wrap pulled tightly as the base and the cling covering the outside of the mold, placed on a parchment lined very flat baking sheet. Line the inside with a curled piece of parchment paper overlapping.
Entremet- Filling Options:
It is nice to have a completed dessert so you can unmold and see the Joconde working. Fill with anything you desire. Layers of different flavors and textures! However, it needs to be something cold that will not fall apart when unmolded.
Suggestions:
Mousses, pastry creams, Bavarian creams, cheesecakes, puddings, curds, jams, cookie bases, more cake (bake off the remaining sponge and cut to layer inside), nuts, fresh fruit, chocolates. I used dark chocolate truffle, raspberry, cake and passion fruit mousse.


Posted by Alessandra on Wednesday Oct 27, 2010
Filed under :Desserts, The Dairing Kitchen
The October 2010 Daring Bakers challenge was hosted by Lori of Butter Me Up. Lori chose to challenge DBers to make doughnuts. She used several sources for her recipes including Alton Brown, Nancy Silverton, Kate Neumann and Epicurious.
One of the recipes we could choose from was a recipe called Bomboloni, which is a doughnut like dough but the shape is a circle. This reminded me of sonhos. A delicious Brasilian dessert. I remember coming out of classes and smelling sonhos being made at the school cafeteria. This is exactly how my house smelled like when I make this recipe. It made me home sick.
Ingredients
1/3 cup + 1 Tablespoon Lukewarm water
3 ¼ teaspoon Active Dry Yeast
1.5 Tablespoon Honey
3 cup All Purpose Flour
3 Tablespoon Milk
6 Egg Yolk
1/3 cup White Granulated Sugar + more for rolling
2 teaspoon Salt
Tablespoon Butter, Unsalted
3 cup Canola Oil (for frying)
Jam, preserves, or jelly (I used doce de leite, goiabada and cream)
In the bowl of a standing electric mixer, mix the water, yeast, honey and 1 cup plus 2 tablespoons (160 gm) of the flour. (Alternatively, whisk the ingredients by hand.) Cover with plastic wrap and let stand at room temperature until foamy, about 1 hour.
Return the bowl to the mixer, fitted with a dough hook. Add the remaining 1 ¾ cups plus 2 tablespoons (260 gm) of flour, along with the milk, egg yolks, 1/3 cup of granulated sugar and the salt. Mix at low speed until blended, then add the butter and knead at medium speed until silky but sticky, about 5 minutes; the dough will not pull away from the side of the bowl.
Using an oiled spatula, scrape the dough into an oiled bowl and cover with plastic wrap. Refrigerate overnight.
In a large saucepan, heat the canola oil to 360°F/180°C. Line a rack with paper towels. Fill a shallow bowl with 1/2 inch of granulated sugar. On a lightly floured surface, roll out the dough a scant 1/2 inch (12 mm) thick. Using a 2-inch (50 mm) round biscuit cutter, stamp out rounds. The original recipe said to not re-roll the dough, but I did and found it to be fine.

Fry the rounds, 4 to 5 at a time, until they are browned, about 4 minutes (mine only took about a minute each – try to go more by sight). Be sure to keep the oil between 360°F and 375°F (180°C and 190°C). Drain the bomboloni on paper towels.
Roll them in the granulated sugar.
Fit a pastry bag with a plain donut tip (or a 1/4-inch (6 mm) tip) and fill with the preserves (you can also use a squeeze bottle). Poke the tip three-fourths of the way into the bomboloni and squeeze in the preserves, pulling the tip out slightly as you squeeze to fill them as much as possible.

Serve warm.

Posted by Alessandra on Monday Sep 27, 2010
Filed under :Desserts, The Dairing Kitchen
The September 2010 Daring Bakers’ challenge was hosted by Mandy of “What the Fruitcake?!” Mandy challenged everyone to make Decorated Sugar Cookies based on recipes from Peggy Porschen and The Joy of Baking.
She set the theme for the cookies as “September”. We were inspired to bake any shape, size or color that means “September” for us. Since I am from Brasil and September is Brasil’s independence month I thought of making something that had to do with Brasil!

Basic Sugar Cookies:
Makes Approximately 36x 10cm / 4″ Cookies
½ cup + 6 Tbsp Unsalted Butter, at room temperature
3 cups + 3 Tbsp All Purpose / Plain Flour
1 cup Caster Sugar / Superfine Sugar
1 Large Egg, lightly beaten
1 tsp Vanilla Extract / Or seeds from 1 vanilla bean
Directions
• Cream together the butter, sugar and any flavorings you’re using. Beat until just becoming
creamy in texture.
• Beat in the egg until well combined, make sure to scrape down the sides of the bowl. Add the sifted flour and mix on low until a non sticky dough forms.
• Knead into a ball and divide into 2 or 3 pieces.
• Roll out each portion between parchment paper to a thickness of about 0.2 inch
• Refrigerate for a minimum of 30mins.
• Tip: Recipes commonly just wrap the whole ball of dough in clingwrap and then refrigerate it for an hour or overnight, but by rolling the dough between parchment, this shortens the chilling time and then it’s also been rolled out while still soft making it easier and quicker.
• Once chilled, peel off parchment and place dough on a lightly floured surface.
• Cut out shapes with cookie cutters or a sharp knife.
• Arrange shapes on parchment lined baking sheets and refrigerate for another 30mins to an hour.
• Tip: It’s very important you chill them again otherwise they’ll spread while baking.

• Re-roll scraps and follow the above process until all scraps are used up.
• Preheat oven to 350°F
• Bake until golden around the edges, about 8-15mins depending on the size of the cookies.
• Leave to cool on cooling racks.
• Once completely cooled, decorate as desired.
• Tip: If wrapped in tinfoil/cling wrap or kept in airtight containers in a cool place, un-decorated
cookies can last up to a month.
I used half of the recipe to cut my shapes. The other half I wrapped it in plastic wrap and frooze it for later use. I also got a little bit of the dough and flavored with lemon, coconut and chocolate cherries to see how they turn out.
Royal Icing:
2½ – 3 cups Icing / Confectioner’s / Powdered Sugar, unsifted
2 Large Egg Whites
2 tsp Lemon Juice
1 tsp Almond Extract, optional
Directions:
• Beat egg whites with lemon juice until combined.
• Tip: It’s important that the bowls/spoons/spatulas and beaters you use are thoroughly cleaned and grease free.
• Sift the icing sugar to remove lumps and add it to the egg whites.
• Tip: I’ve listed 2 amounts of icing sugar, the lesser amount is good for a flooding consistency, and the larger amount is for outlining, but you can add even more for a much thicker consistency good for writing. If you add too much icing sugar or would like to make a thinner consistency, add very small amounts of water, a few drops at a time, until you reach the consistency you need.
• Beat on low until combined and smooth.
• Use immediately or keep in an airtight container.
• Tip: Royal Icing starts to harden as soon as it’s in contact with air so make sure to cover containers with plastic wrap while not in use.
Decorating Your Cookies:
I outlined the shape of the cookie with the royal icing. Then you are going to use a technique called flooding. All you need to do for this is to thin out the royal icing a little bit with water. (Drag a knife through the surface of the Royal Icing and count to 10. If the surface becomes smooth between 5 & 10 seconds, the icing is at the correct consistency.) After you get your desired consistency just fill in the outlined areas.

You can also use this a toothpick to make some fun designs 😀

Posted by Alessandra on Tuesday Jul 27, 2010
Filed under :Desserts, The Dairing Kitchen

The July 2010 Daring Bakers’ challenge was hosted by Sunita of Sunita’s world – life and food. Sunita challenged everyone to make an ice-cream filled Swiss roll that’s then used to make a bombe with hot fudge. Her recipe is based on an ice cream cake recipe from Taste of Home.
This was a fun challenge. It was perfect for the hot summer we are having! I thought it was light and easy to use your creativity. You could make a white cake, chocolate cake. You can choose so many different ice cream flavors and the fudge just brings it all together. I decided to make my bombe with a chocolate cake, filled with a Peach whipped cream. Inside the bombe I choose to have vanilla ice cream, chocolate fudge and peaches.
First you will need to make The cake:
6 medium sized eggs
1 C sugar + extra for rolling
6 tblsp flour + 5 tblsp unsweetened cocoa powder, sifted together
2 boiling water
a little oil for brushing the pans
Pre heat the oven at 400 F . Brush the baking pans ( 11 inches by 9 inches ) with a little oil and line with parchment paper.
In a large mixing bowl, add the eggs and sugar and beat till very thick; when the beaters are lifted, it should leave a trail on the surface for at least 10 seconds.

Add the flour mixture, in three batches and fold in gently with a spatula. Fold in the water.

Divide the mixture among the two baking pans and spread it out evenly, into the corners of the pans.

Place a pan in the center of the pre-heated oven and bake for about 10-12 minutes or till the center is springy to the touch
Spread a kitchen towel on the counter and sprinkle a little sugar over it.
Turn the cake on to the towel and peel away the baking paper. Trim any crisp edges.
Starting from one of the shorter sides, start to make a roll with the towel going inside. Cool the wrapped roll on a rack, seam side down.
Repeat the same for the next cake.
The cake filling–
2 C whipping cream
1 vanilla pod, cut into small pieces of about ½ cm (or 1 tsp vanilla extract)
5 tblsp caster sugar
1/2 c of peaches (I took the skin out and diced them into small pieces)
Grind together the vanilla pieces and sugar in a food processor till nicely mixed together. If you are using vanilla extract, just grind the sugar on its own and then add the sugar and extract to the cream. Beat cream and vanilla sugar until very thick. Fold in cut peaches.

Open the cake rolls and spread the cream mixture, making sure it does not go right to the edges (a border of ½ an inch should be fine). Roll the cakes up again, this time without the towel. Wrap in plastic wrap and chill in the fridge till needed, seam side down.
The vanilla ice cream-
2 and ½ C whipping cream
1 vanilla bean, minced or 1 tsp vanilla extract
½ C of granulated sugar
Grind together the sugar and vanilla in a food processor. In a mixing bowl, add the cream and vanilla –sugar mixture and whisk lightly till everything is mixed together. If you are using the vanilla extract, grind the sugar on its own and then and the sugar along with the vanilla extract to the cream.
Pour into a freezer friendly container and freeze till firm around the edges. Remove from the freezer, beat till smooth and return to the freezer. Do this 3-4 times and then set completely.
The Hot fudge sauce-
1 C sugar
3 tblsp cocoa powder
2 tblsp cornstarch
1 and ½ C water
1 tblsp butter
1 tsp vanilla extract
In a small saucepan, whisk together the sugar, cocoa powder, cornflour and water.
Place the pan over heat, and stir constantly, till it begins to thicken and is smooth (for about 2 minutes).
Remove from heat and mix in the butter and vanilla. Keep aside to cool .
How to put it all together:
Slice your cakes into about 1 inch slices. Line a bowl with plastic wrap and arrange two slices at the bottom of the bowl, with their seam sides facing each other. Arrange the Swiss roll slices up the bowl, with the seam sides facing away from the bottom, to cover the sides of the bowl. Cover the bowl with plastic wrap and freeze till the slices are firm (at least 30 minutes).

Soften the vanilla ice cream. Take the bowl out of the freezer, remove the cling film cover and add the ice cream on top of the cake slices. Spread it out to cover the bottom and sides of the bowl. Cover the bowl with plastic wrap and freeze till firm ( at least 1 hour)
Add the fudge sauce over the vanilla ice cream. Fill it with peach slices and cover with the rest of cake. Freeze till firm ( at least an hour)

Place the serving plate on top of the bowl. Turn it upside down and remove the bowl and the plastic lining. If the bowl does not come away easily, wipe the outsides of the bowl with a kitchen towel dampened with hot water. The bowl will come away easily.

Slice and serve! YUM

Posted by Alessandra on Sunday Jun 27, 2010
Filed under :Desserts, The Dairing Kitchen
The June 2010 Daring Bakers’ challenge was hosted by Dawn of Doable and Delicious. Dawn challenged the Daring Bakers’ to make Chocolate Pavlovas and Chocolate Mascarpone Mousse. The challenge recipe is based on a recipe from the book Chocolate Epiphany by Francois Payard

Pavlova is meringue based dessert usually filled with cream and fresh fruits. It is very light and delicious. The challenge this month had us make a chocolate version filled with chocolate mousse and drizzled with a Mascarpone Cream that use Crème Anglaise as a base. It was very good. I decided to make mini pavlovas. I also had a bit of chocolate mousse and mascarpone cream left which turned into an amazing cake! Will post pictures! I hope you try this recipe. It was way worth it. There will be 4 recipes here. The first will be the meringue for the pavlova shell. Second will be the chocolate mouse. Third and Fourth will go together. You need to make Third (Crème Anglaise) so you can make recipe four which is the Mascarpone Cream
Recipes are adapted from the Daring Kitchen Arquives
Recipe 1: Chocolate Meringue (for the chocolate Pavlova):
3 egg whites
½ cup plus 1 tbsp granulated sugar
¼ cup powder sugar
1/3 cup cocoa powder
Line two baking sheets with silpat or parchment and set aside. Preheat the oven to 200º F.
In the mixer, whip the egg whites until soft peaks form. Increase speed to high and gradually add granulated sugar about 1 tbsp at a time until stiff peaks form. (The whites should be firm but moist.)
Sift the powder sugar and cocoa powder over the egg whites and fold the dry ingredients into the white.

Fill a pastry bag with the meringue. Pipe the meringue into whatever shapes you desire. Alternatively, you could just free form your shapes and level them a bit with the back of a spoon. (Class made rounds, hearts, diamonds and an attempt at a clover was made!) As you can see I made little cups. I used the star tip and just piped the bottom as a circle, then piped one more time around creating the edge.

Bake for 2-3 hours until the meringues become dry and crisp. Cool and store in an airtight container for up to 3 days.
Recipe 2: Chocolate Mascarpone Mousse:
1 ½ cups heavy cream
grated zest of 1 average sized lemon
9 ounces 72% chocolate, chopped
1 2/3 cups mascarpone
pinch of nutmeg
2 tbsp orange juice
Put ½ cup of the heavy cream and the lemon zest in a saucepan over medium high heat. Once warm, add the chocolate and whisk until melted and smooth. Transfer the mixture to a bowl and let sit at room temperature until cool.
Place the mascarpone, the remaining cup of cream and nutmeg in a bowl. Whip on low for a minute until the mascarpone is loose. Add the orange juice and whip on medium speed until it holds soft peaks. (DO NOT OVERBEAT AS THE MASCARPONE WILL BREAK.)
Mix about ¼ of the mascarpone mixture into the chocolate to lighten. Fold in the remaining mascarpone until well incorporated. Fill a pastry bag with the mousse. Pipe or fill your meringue shells.
Recipe 3: Crème Anglaise (a component of the Mascarpone Cream below): (I made half of this recipe)
1 cup whole milk
1 cup heavy cream
1 vanilla bean, split or 1 tsp pure vanilla extract
6 large egg yolks
6 tbsp sugar
In a bowl, whisk together the egg yolks and sugar until the mixture turns pale yellow.
Combine the milk, cream and vanilla in a saucepan over medium high heat, bringing the mixture to a boil. Take off the heat.
Pour about ½ cup of the hot liquid into the yolk mixture, whisking constantly to keep from making scrambled eggs. Pour the yolk mixture into the pan with the remaining cream mixture and put the heat back on medium. Stir constantly with a wooden spoon until the mixture thickens enough to lightly coat the back of a wooden spoon. DO NOT OVERCOOK.

Remove the mixture from the heat and strain it through a fine mesh sieve into a bowl. Cover and refrigerate until the mixture is thoroughly chilled, about 2 hours or overnight.
Recipe 4: Mascarpone Cream (for drizzling): (also made half of this recipe)
1 recipe crème anglaise
½ cup (120 mls) mascarpone
2 tbsp orange juice
½ cup (120 mls) heavy cream
Prepare the crème anglaise. Slowly whisk in the mascarpone and the orange juice and let the mixture cool.
Put the cream in a bowl and beat with electric mixer until very soft peaks are formed.
Fold the cream into the mascarpone mixture.

Assembly:
Pipe the mousse onto the pavlovas and drizzle with the mascarpone cream over the top. Dust with confectioner’s sugar and fresh fruit if desired.

Here is the cake idea I made with the leftovers.

It is a chocolate cake filled with chocolate mouse and mascarpone cream. Covered with Chocolate mouse. Topped with bitters sweet chocolate mouse, chocolate mouse, raspberries. Sides are crushed pavlovas and drizzled with mascarpone cream.

Posted by Alessandra on Thursday May 27, 2010
Filed under :Desserts, The Dairing Kitchen
The May 2010 Daring Bakers’ challenge was hosted by Cat of Little Miss Cupcake. Cat challenged everyone to make a Piece Montée, or croquembouche, based on recipes from Peter Kump’s Baking School in Manhattan and Nick Malgieri.

I joined the Daring Kitchen last month and have been anxiously waiting to hear what the challenge of April would be. I was so excited to see that a Piece Montée would be my first Daring Kitchen challenge. I have always wanted to make one of these.
A Piece Montée, also called Croquembouche is a French dessert. It is basically a montage of those delicious cream puffs. The cream puffs are made with Pate a Choux. (If you have never tried making Pate a Choux, try it. It is easy and delicious. You can make puffs, eclairs and let your imagination run with it.) Then you have the filling, usually a pastry cream. Then you have the glaze, usually sugar or chocolate.
I decided to fill my puffs with whipped cream and Dulce di Leche. Then I couldn’t decide on the glaze so I thought it would be fun to do both chocolate and spun sugar.
Pate a Choux (recipe from The Daring Kitchen Archives)
¾ cup water
6 Tbsp. unsalted butter
¼ Tsp. salt
1 Tbsp. sugar
1 cup all-purpose flour
4 large eggs
For Egg Wash: 1 egg and pinch of salt
Pre-heat oven to 425◦F degrees. Line two baking sheets with parchment paper.
Combine water, butter, salt and sugar in a saucepan over medium heat. Bring to a boil and stir occasionally. At boil, remove from heat and sift in the flour, stirring to combine completely.
Return to heat and cook, stirring constantly until the batter dries slightly and begins to pull away from the sides of the pan.
Transfer to a bowl and stir with a wooden spoon 1 minute to cool slightly.
Add 1 egg. The batter will appear loose and shiny. As you stir, the batter will become dry-looking like lightly buttered mashed potatoes.
It is at this point that you will add in the next egg. Repeat until you have incorporated all the eggs.

Transfer batter to a pastry bag fitted with a large open tip (I piped directly from the bag opening without a tip). Pipe choux about 1 inch-part in the baking sheets. Choux should be about 1 inch high about 1 inch wide. Using a clean finger dipped in hot water, gently press down on any tips that have formed on the top of choux when piping. You want them to retain their ball shape, but be smoothly curved on top. Brush tops with egg wash (1 egg lightly beaten with pinch of salt).

Bake the choux at 425◦F degrees until well-puffed and turning lightly golden in color, about 10 minutes.
Lower the temperature to 350F degrees and continue baking until well-colored and dry, about 20 minutes more. Remove to a rack and cool.
Can be stored in a airtight box overnight.

I used a pastry bag with a star tip and filled some of them with Dulce di Leche

some with whipped cream

Then I dipped them in chocolate (milk and white) and here is a picture of the tower 😀

I had never done spun sugar before and it was an interesting project. Fun though… I decided to decorate my piece with sugar art and some spun sugar.


